If you follow me on Twitter or RSS follow this blog then you’ll know that I’m a keen photographer. Although I’ll dabble in landscape, and have done some work with models, wildlife is my thing.
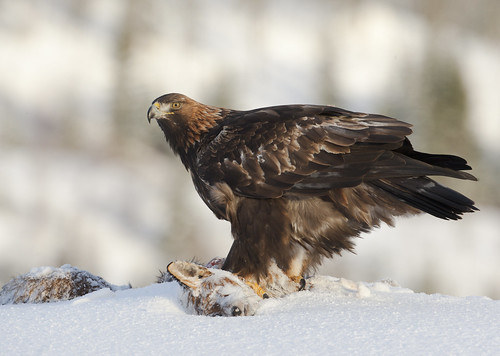 A Golden Eagle in Flatanger, Norway, that I photographed in 2012
The best photographers (and I am definitely not one of them!) will tell you that the equipment does not make the photographer great; the photographer makes the gear great. One of the best pro wildlife photographers I have shot with knows how to use just a few controls on his top range cameras – but he knows the right controls and has an artist’s eye. But we do need some gear, and I get asked about what I use … a lot. So here goes.
The Laptop
I use an Asus UX31e ultrabook. It came with Windows 7 but it now runs Windows 8. The internal storage is just 128 GB … which is pretty pathetic for someone who could shoot 32 GB of photos on a good day. There is a USB 3.0 port and that pairs up nicely with a Toshiba USB 3.0 drive.
Photo Editing
To many, photoshopping has a negative connotation. It is often meant as “changing the photo to what it wasn’t” or “faking the picture”. Can Photoshop do that? Yes. But when used right (see Guy Gowan) then Photoshop does what has been done in the dark room since photography began. Yes, the roll of film you (or our parents) sent off was “photoshopped” using chemicals … pretty nasty and carcinogenic chemicals … to look the way they looked. Ansel Adams was a master of editing. And if it was good enough for him … ![]()
I use Photoshop CS6. I’ve kept myself up to date for the most part. I shoot in RAW and I will upgrade CS to ensure that the ACR RAW converter to ensure that I have support for a new camera body. My editing approaches have changed quite a bit over the years. I used to live in edit layers and masks. Now the majority of my work is done in ACR to edit colour temperature, tint, exposure, contrast, colour, and sharpness. Any selective brush work gets done using layers and masks later on. And if I’m being particularly careful, I’ll only do my sharpening when I resize a photo for print.
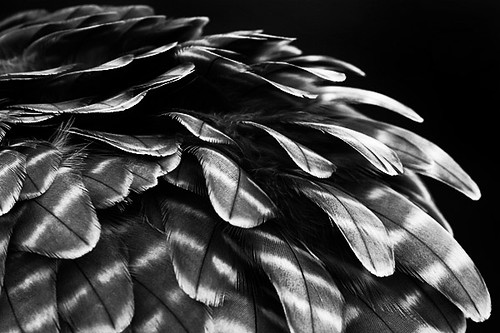
A falcon grooming, Woodlands Falconry, Tullow, Ireland.
Many photographers prefer Adobe Lightroom because it’s designed specifically for photographers. I’ve been tempted in the past, but the lack of layers is a problem for me.
Printing
A career in IT has led me to hating printers. But I got tired of paying for online printers to produce my images, only to find I needed to get a reprint done. Several years ago I splashed out on an Epson R2880 A3+ printer. This allows me to control the entire process from beginning to end … and take responsibility (the blame) for any mistakes.
Serious photographers love Epson printers. These monster machines take a bunch of inks (8 in this one) with a wide gamut of colour. We’re very specific with our papers. We’ll use a paper with a correct matching printer profile (where you select the specific paper you are using). We’ll use manufacturer’s ink too. That’s because the paper profile was programmed to expect the manufacturers ink. It knows how much ink is required and how that ink reacts on that specific paper … and that gives us predictable colour. I can tell when someone has gotten their prints done at the local supermarket. A printing pro I know can troubleshoot your printer/monitor just by glimpsing at your prints!
Colour Control
OK… I can control colour in Photoshop. But how reliable will that be if what is displayed isn’t correct? Have you ever walked into an electronics store to look at and compare TVs? Did you notice how each picture looks different even though they are all showing the same program or movie? This is because no two screens are alike. Neither Windows nor Mac OS can account for this. They’ll transmit what they think are red, green, blue, pure white, pure black, etc, to the screen and hope for the best. That means that you’ll edit something to get it looking nice on screen, but if the screen (and it is) not true, then you have no predictability when it comes to the finished result … be it on paper or one someone else’s screen.
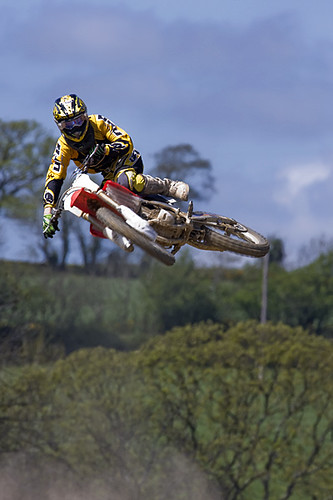
Southeast Motoross, Ferns, Ireland
This is why we calibrate our screens. Windows has a feature to do this but it’s not that useful. The only really dependable way to calibrate a screen is to use an appliance. I use a Spyder II Express, a budget device that I got several years ago. I literally hang it on my screen and run the software. The software runs the device via USB. It displays a range of images over a few minutes, and the device measures what it sees. The displayed image is compared with what the software knows it is sending to the screen. The differences are used to create a colour profile, and this is loaded into Windows.
The difference is amazing. A photo’s colour and contrast look totally different on screen when the profile is loaded. Now I can edit a picture while seeing the real colour and contrast. Then when I print, I’m also using the correct ink and paper profile … so I should get the image right from one end of the workflow to the other.
Honestly, Windows does a pretty poor job from here. This might be why a lot of printing houses prefer Macs. I have to run a driver to load the resulting Windows colour profile, and Windows forgets it every time I reboot, lock, logout, etc. And honestly, I am having a rough time with Windows 8, CS6, and colour profiles.
The Camera
This is the least important piece of the kit. Eh!?!?! It’s true. People place so much emphasis on the camera. I was guilty of this too. Wildlife photography taught me that subject knowledge, field craft and lenses were more important. Model photography taught me that creative (which Iack) and artificial lighting are critical. Landscape photography is about good weather/sunrise/tidal apps on your phone, and light filters. The camera captures what it sees and all those other things affect what the camera sees.
Wildlife and sports (I’ve done some motor sports stuff) photography test the mechanical ability of a camera more than other kinds of photography. I work with usually uncooperative subjects that want nothing to do with me. They sometimes are moving fast and in unpredictable ways. For this, we need a camera that shoots lots of frames per second and focuses really fast. We also shoot in low light sometimes, so we need to increase ISO (ASA in the film world) to get faster shutter speeds (for detail when there is movement) and this can create nasty grain in a photo called noise.
I started off on a Canon 350D (this family is known as the Rebel in the USA) digital SLR after a series of compacts. It was a great entry level machine, and a search on Flickr will show you how great it really is; people are still using it to capture amazing images. It was slow to focus and had a slow frame rate, and ISO could not be increased above 400 without paying a nasty price. I upgraded to a Canon 40D (a midrange DLSR, since been surpassed by the 60D) to get a faster frame rate (around 6.5 per second), better focus (for birds in flight), and noise control (up to 640 was acceptable). Eventually I traded up to the top end of the family …
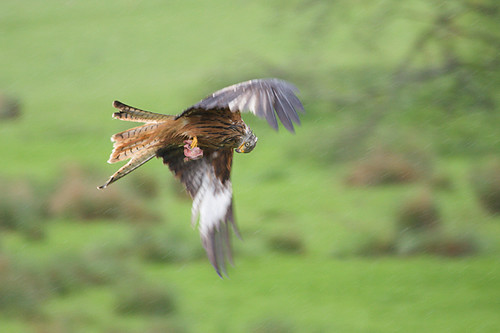
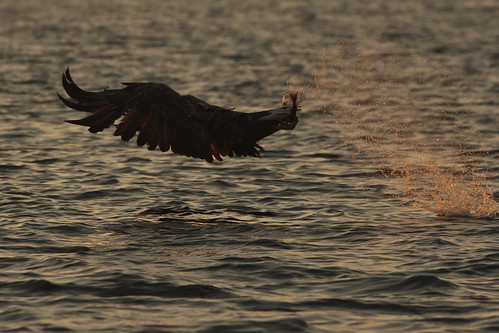
Red Kite, Gigrin Farm, Powys, Wales
I bought a used Canon 1D mk III when the 1D mk IV was launched. You see, during all this time, I wasn’t changing my lenses. Lenses are for “life”, camera bodies come and go. I realised cameras were like cars. You can buy one new, and sell it at a major loss 2 years later. But when you move up to the top end of the DSLR market, then these things are seriously good and have a decent resale value. The 1D mk III gave me acceptable ISO up to 800-1000 (depending on conditions) and 10 frames per second. Last year, I moved to the 1D mk IV (after the 1D X was launched), again buying a used model. I buy these used bodies from a pro shop, knowing that they are fussy about the bodies they’ll buy/sell and they come with a guarantee. Now I shoot at 10 FPS with good noise up to ISO 1250. And the focus is superb. There’s a lot of work to tuning the focus controls (there’s some studying to do) but it’s worth it. It’s my first DSLR to offer video recoding and that’s something I’m experimenting with now.
You didn’t see me comment on megapixels … or megapixies as I like to call them. That’s one of the few things that camera companies have to fool the unaware consumer with. Megapixies are way beyond the point of influencing picture quality at this point, even in camera phones. In reality, MPs tell us how big of a print we can get without getting pixelation. An un-cropped 8 MP image can give you an A3 print. How many A3 prints do you make? I have such a printer and I don’t do that many of them. In fact, squeezing MPs into a tiny sensor can decrease picture quality by introducing digital noise (seen as grain and nasty purple/magenta pixels). That’s why I laugh at teeny sensors in phones with 13 MP and a tiny plastic lens. I’d rather see a good lens, and a reasonably sized sensor. Where MP is important to me is for cropping. I am often restricted on how close I can get to a subject, so I sometimes will crop a 16 MP image down to as low as 5 MP and still have a decent sized image with detail (assuming I focused OK).
Canon, Nikon, it really does not matter. Both bodies are superb. One will leap past the other with the newest generation in that market niche every few months. I get some ribbing about this at work – I’ve invested in Canon gear and I started to work for a Nikon distributor 2 years ago! Sony also do some interesting things with image stabilisation in the body rather than the lens.
When asked about cameras, I warn the prospective buyer to beware. Buying the DSLR is just the start of the assault on their bank account.
Tripod
This is an essential tool for stabilizing the camera and lens. Hand shake will cause a picture to become soft. So we need to remove the human element. Beginners always make the same mistake; they’ll buy a cheap set of “legs”. Soon they learn of their folly, dispose of those legs at a loss, and buy a set for maybe $100. And then they’ll realise they messed up again, and move to the legs and head they should have gotten in the first place. Like lenses … actually more so than lenses, legs are for life. In fact, if you buy a good set of legs, you’ll find that you can pretty much replace or service every part in those legs.
I’ve use Manfrotto for my legs since 2007. I use a Manfrotto 055CXPro4 carbon fibre 4 section tripod. It’s light for hiking, fits in a suitcase for air travel, extends out nice and tall, and supports a decent weight. It’s a superb general purpose set of legs.
There is something I’ve learned over the years: you should always try to get at eye level with the subject when photographing living things. You don’t photograph the top of a child’s head; you kneel down to get a portrait. You don’t photograph the top of a duck in a pond; you lie down to get a nice eye level photo. If I want a stable photo then I need my tripod to go flat. My Manfrotto can’t do that because it has a center column. I’m actually thinking of buying a Gitzo carbon fibre tripod with no center column. However, I hate the rotating leg log mechanims of Gitzos because they completely cease up if beach sand gets into them. Manfortto’s fliip locks are way superior, even if you can trap some finger skin in the cold which feels like an amputation!

Cattle Egret, Viera, Florida, USA.
The legs are that and nothing more. I cannot attach a lens/camera to this Manfrotto without a head. I use 2 heads. The 804RC2 tilt head is a nice general head that suits landscape photography. It allows control over 3 axes: left/right, tilt through portrait/landscape, and up/down.
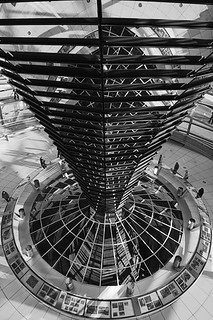
The Bundestag, Berlin, Germany
For a big lens, you need something more … substantial. Nothing comes close to the Wimberley gimbal head for supporting a large lens and giving clean & smooth movement. It’s a pricey piece of kit and there are many impersonators. But none of those impersonators last as long or as stable as this solid piece of USA engineering. You typically are using this with a big lens. That means the center of gravity is the lens and you attach the lens to the head. An arca plate is attached to the foot of the lens, and this clips into the head. You micro-adjust everything to get it balanced and then you can swing through reliably.
The Lenses
The better the lens, the better the image. But that doesn’t mean that an expensive lens is the only way forward. I know that some Tamron/Tokina lenses have great reputations. Both Nikon and Canon make a “nifty 50”. This is a 50 mm “standard view” F1.8 lens that costs around $110. It’s a super sharp lens and is great for portraits on a cropped sensor DSLR.
My landscape lens is an EF 17-40 lens. This is a must-have for many Canon landscape shooters.
Others like something with a bit more flexibility like a 24-70 F2.8 mm lens. I have not splashed out on this “walk around lens”. I‘d love one ![]() but they are pricey. It’s not limited to landscapes; t’s not a bad portrait lens (the 70-200 F2.8 is the mamma jamma in that area) and it can be useful for captive animal photography too.
but they are pricey. It’s not limited to landscapes; t’s not a bad portrait lens (the 70-200 F2.8 is the mamma jamma in that area) and it can be useful for captive animal photography too.
For years, my biggest lens was the EF 100-400 F4.5-5.6 L IS. This lens features image stabilisation, which can counter some amount of hand shake. However, it’s still best, as are all lenses, on a tripod. However, it is still my “walk around” wildlife lens. The flexibility to move from 100mm to 400mm is also very useful. A common creative trap that big lens owners fall into is the desire to fill the frame. Great nature photographers like Craig Jones (UK) show how important the environment around the subject can be in a photo. This is a lens that does not appear on the used market very often. And when it does, it doesn’t stay there long. It’s a very popular lens.
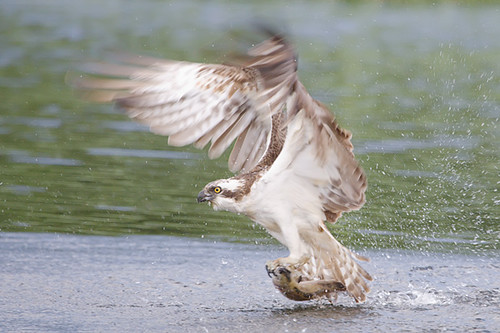
Osprey with trout, Rothiemurchus, Cairngorns, Scotland
Some folks prefer to use the cheaper EF 400 L F5.6 lens. It is fixed at 400 mm and has no IS. This limits the hand holding to brighter conditions and limits the flexibility of the lens.
After a lot of saving, I bought a big gun. The EF 500 mm F 4.0 L IS is a big lens. I was drawn to it because it was longer, getting me closer to a subject, and it wasn’t so big that (a) I couldn’t afford it and (b) it was still transportable. This focus on this lens is amazing. But there’s an art to it.
A rookie mistake is to buy a big lens and expect instant results. You have to learn how to use such a lens. It’s almost like learning to use a rifle over long distances; you need to steady the lens on the tripod, control your breathing, understand your camera’s focus, and understand shutter speed’s relationship to lens focal length. When you get it right you drool at the photo. When you get it wrong you wonder why you spent all that money and question how you could ruin the opportunity you had.

Peregrine Falcon in heather, Mid-Wales Falconry, Wales
On kit lenses: they are nice to learn with, and can have a nice result in the mid range (length and aperture) but they are bundled because they are “cheap” and are therefore compromised. If you want a long term solution then buy the body without a lens, and buy the lens you really want.
Don’t bother asking me for the “best” lens – it all depends on lots of specifics.
Filters
Some people think that the store makes a huge profit from cameras. I can confirm that this is a myth. They need to sell you the accessories to remain in business. A commonly sold accessory when they sell you a lens is a UV filter. They do have a use. They can limit the effect of haze and they can protect the front element of the lens against damage. The latter is OK for a low end lens. But if you buy a very nice lens, do you want to put cheap glass or plastic in front of it? You might as well have bought the cheap lens. If the result is important, then you should insure your gear properly.
I do use a UV filter on my 100-400 if I’m going to something like motocross. I know there’s a strong chance of a stone hitting the lens. But I remove it afterwards. I know that the UV filter effects the image; it’s especially noticeable in the out of focus bokeh.
Landscape photographers really want 2 kinds of filter. The first is a circular polariser. There’s a whole physics lesson there. Long story short, it can reduce/enahnce reflections on water, and enhance colour when 90 degrees to the sun, depending on how you rotate the filter. I use a Rodenstok 88030 E77 circular polarizer that I picked up in Las Vegas back in 2007 and got some cracking stuff in the desert with. It can give some very pleasing effects. I’ve never seen this filter outside of the USA.
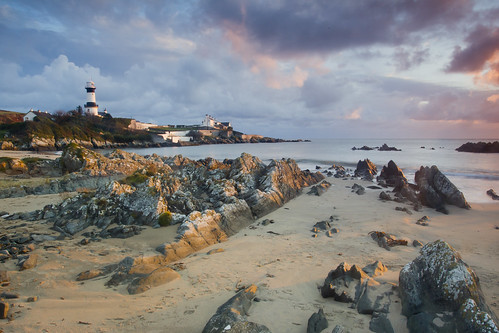
Malin Head, Donegal, Ireland
The second kind is the neutral density filter. There are many kinds. The plain ND filter limits the amount of light being let into the lens, and this slows down shutter speeds (blur motion). A graduated ND filter (ND grad) is normally used to darken the sky to balance it with the foreground. A hard grad ND is used at the coast when there’s a hard divide along the horizon (the sea). A soft grad used when the horizon is not a straight line and the graduation goes smoothly from darkened to clear. If you’ve seen an episode of BBC’s Top Gear, then you’ve seen these kinds of filters in action for style. If you’ve watched CSI Miami, then you’ve seen the effects of tobacco coloured filters.
I started off with Cokin filters. For limited stuff, they’re OK. But using 2 of them at once tints the picture badly. I recently started switching over to Lee filters. Singh-Rey might be the best I know of, but they are crazy expensive. Lee Filters are pricey but nothing in comparison … and if they’re good enough for the best, then they’re good enough for me. I started off with … the Foundation Kit (requires a ring holder to fit your lens).
Lee Filters are handmade and very popular, getting amazing reviews in magazines and by customers. In fact, they’re often not in stock … anywhere. Their “big stopper” (a 10 stop filter) is much sought after.
Storage Cards
I use 45 Mbps Compact Flash cards. I’ve a collection of 8 GB and 16 GB SanDisk cards, and a few 32 GB Kingston cards. Shooting 10 frames per second at 16 MP will fill those quickly! And you don’t want something to happen while you’re changing a card. I used to use a 40 GB Espon image tank when 1 GB of CF was expensive. But image tanks aren’t worth the money any more.
A concern for a wildlife shooter is burst length: how long can I shoot while the subject is doing something. It’s around 5 seconds for me at 10 FPS. I wondered if the speed of the CF card was a bottleneck that caused the camera buffer to fill. I bought a 95 Mbps SD card (my camera can use both formats) when in the USA recently and compared burst lengths: there was no difference. The camera’s ability to write to the card is the limit now, rather than the card’s own write speed.
Camouflage
I’m an interesting sight when in all the gear! I bought used military clothing from a surplus store. I have balaclavas, hats, gloves that allow my to fold back the fingers/thumb so I can direct touch on the camera controls, hiking boots, thermal clothing, and waterproof clothing. I’ve walked the plains or Tanzania near the equator and sat for hours in –10 C in the middle of Winter.

Melissa DuPlooy, Wexford, Ireland
In the back of my car you’ll find a plastic container with more stuff: hiking boots, wellies, and a pop-up hide (Americans call it a blind). There’s also a large scrim net (military string camo for hiding stuff).
Ironically, a recent shoot in Florida gave me one of my best encounters while wearing blue jeans and a t-shirt with no attempt to hide. The bird (a Bittern) came so close to me that the camera couldn’t focus any more and I had to resort to using my iPhone!
Bags
I have a number of bags that I use for different situations. For flying with the big gun, I use a Thinktank Photo Airport Accelerator V2. It is sized to carry an EF 500 F4 with my camera, 100-400, 17-40, and a few other bits and bobs as a carry-on bag with the likes of Jet Blue or Ryanair (very fussy and constantly measuring large looking bags). There is a slot for a laptop. A slim laptop like an ultrabook will fit in and has gotten through Ryanair’s checks. A water proof cover folds up inside the bag.
For landscape stuff I’ll use a Lowepro Computrekker AW bag. This takes a 100-400, camera, etc and fits a 15” laptop in a dedicated slot. The bag has a rain-proof cover that folds away and you can attack a tripod using a foot pocket and elasticated bands.
I like to walk around with the 100-400 but I also want to be able to carry around the 500mm without carrying a much larger bag. The Tamrac 5793 allows me to do this. This is a glorified tube for the big lens. It fits an attached body. A tripod can be attached, as well as other containers for lenses.
—
So that’s the gear I use for photography. It’s a long post, but it’ll give you an idea of what I get up to when I’m not sat in front of Hyper-V Manager ![]()
White-Tailed Sea Eagle, Flatanger, Norway
You pick up some awesome shots, i am saving for the 100-400 for my canon that I use, wildlife and urban shots are what i work with most and i agree with everything you said above. Somebody with a great eye for art and knows how to use a camera can take amazing shots with even the worst camera if the situation allows the camera to work. Nice article and again i love the images.
You’ll love the 100-400. Check out some local professional camera stores to see if there’s any used stock. Sometimes you see newspapers switching brands and they’ll do a complete dump of their lenses. This happened here last year and it was like blood being thrown into a shark pool.
Great post Aidan. As an aspiring photographer, your perspective was insightful.